맛집 앱 만들기 프로젝트 Part8 홈 스크린 및 Input컴포넌트 구현하기
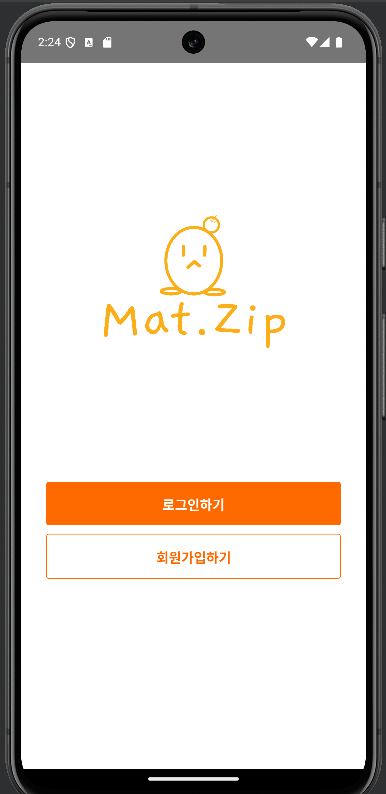
최초 화면에 로고를 표시하기 위해 로고 파일 넣기
[matzip/front/src/assets/matzip.png] 해당 경로로 폴더 및 로고파일 넣어주도록하자
[matzip/front/src/screens/AuthHomeScreen.tsx] 파일 코드를 수정하자
- 20번째 줄에 react-native에서 기본으로 제공하는 Image 컴포넌트를 사용해서 로고를 불러오도록하였다 resizeMode 옵션으로 contain을 주어 이미지의 가로 세로 비율을 유지한 상태로 이미지를 리사이징하며 이미지의 모든 영역이 뷰 안에 보이게하도록 하였다 style은 하단에 따로 지정하도록했다 source는 로고 경로
1
2
3
4
5
6
7
8
9
10
11
12
13
14
15
16
17
18
19
20
21
22
23
24
25
26
27
28
29
30
31
32
33
34
35
36
37
38
39
40
41
42
43
44
45
46
47
48
49
50
51
52
53
54
55
56
57
58
59
60
61
62
import {StackScreenProps} from '@react-navigation/stack';
import React from 'react';
import {
  Button,
  Dimensions,
  Image,
  SafeAreaView,
  StyleSheet,
  View,
} from 'react-native';
import {AuthStackParamList} from '../../navigations/stack/AuthStackNavigator';
import {authNavigations} from '../../constants/navigations';
import CustomButton from '../../components/CustomButton';

type AuthHomeScreenProps = StackScreenProps<AuthStackParamList>;
function AuthHomeScreen({navigation}: AuthHomeScreenProps) {
  return (
    <SafeAreaView style={styles.container}>
      <View style={styles.imageContainer}>
        <Image
          resizeMode="contain"
          style={styles.image}
          source={require('../../assets/matzip.png')}
        />
      </View>
      <View style={styles.buttonContainer}>
        <CustomButton
          label="로그인하기"
          onPress={() => navigation.navigate(authNavigations.LOGIN)}
        />
        <CustomButton
          label="회원가입하기"
          variant="outlined"
          onPress={() => navigation.navigate(authNavigations.SIGNUP)}
        />
      </View>
    </SafeAreaView>
  );
}

const styles = StyleSheet.create({
  container: {
    flex: 1,
    margin: 30,
    alignItems: 'center',
  },
  imageContainer: {
    flex: 1.5,
    width: Dimensions.get('screen').width / 2,
  },
  image: {
    width: '100%',
    height: '100%',
  },
  buttonContainer: {
    flex: 1,
    gap: 10,
  },
});

export default AuthHomeScreen;
InputField 컴포넌트 구현하기
[matzip/front/src/components/InputField.tsx]
로그인 및 회원가입 페이지 외에도 입력받는 창을 중복적으로 사용하게될텐데 해당 입력 창을 컴포넌트로 작성하여 쉽게 불러와서 사용할 수 있도록 하려고 한다
먼저 입력 창 InputField 컴포넌트 코드를 작성해보도록 한다
1
2
3
4
5
6
7
8
9
10
11
12
13
14
15
16
17
18
19
20
21
22
23
24
25
26
27
28
29
30
31
32
33
34
35
36
37
38
39
40
41
42
43
44
45
46
47
48
49
50
51
52
53
54
55
56
57
58
59
60
61
62
63
64
65
66
67
68
69
70
71
72
73
74
75
76
77
78
79
80
81
82
83
84
import React, {useRef} from 'react';
import {
  Dimensions,
  Pressable,
  StyleSheet,
  Text,
  TextInput,
  TextInputProps,
  View,
} from 'react-native';
import {colors} from '../constants';

// TextInputProps를 확장하여 props를 넘겨받아서 사용할 수 있도록하자
interface InputFieldProps extends TextInputProps {
  disabled?: boolean;
  error?: string;
  touched?: boolean;
}

const deviceHeight = Dimensions.get('screen').height;

const InputField = ({
  disabled = false,
  error,
  touched,
  ...props
}: InputFieldProps) => {
  // 입력창 포커스를 조금 더 정확하게 잡기위해 (주변 클릭해도 입력창으로갈 수 있게) useRef를 활용
  const innerRef = useRef<TextInput | null>(null);
  const handlePressInput = () => {
    innerRef.current?.focus();
  };
  return (
    <Pressable onPress={handlePressInput}>
      <View
        style={[
          styles.container,
          disabled && styles.disabled,
          touched && Boolean(error) && styles.inputError,
        ]}>
        <TextInput
          editable={!disabled}
          placeholderTextColor={colors.GRAY_500}
          style={[styles.input, disabled && styles.disabled]}
          autoCapitalize="none"
          spellCheck={false}
          autoCorrect={false}
          {...props}
        />
        // error변수의 데이터를 확인하여 값이 없으면 안보여주고 값이있고 touche된 상태면 에러를 보여준다
        {touched && Boolean(error) && <Text style={styles.error}>{error}</Text>}
      </View>
    </Pressable>
  );
};

const styles = StyleSheet.create({
  container: {
    borderWidth: 1,
    borderColor: colors.GRAY_200,
    padding: deviceHeight > 700 ? 15 : 10,
  },
  input: {
    fontSize: 16,
    color: colors.BLACK,
    padding: 0,
  },
  disabled: {
    backgroundColor: colors.GRAY_200,
    color: colors.GRAY_700,
  },
  inputError: {
    borderWidth: 1,
    borderColor: colors.RED_300,
  },
  error: {
    color: colors.RED_500,
    fontSize: 12,
    paddingTop: 5,
  },
});

export default InputField;
LoginScreen 파일 코드 작성
[matzip/front/src/screens/LoginScreen.tsx]
위에서 만들어둔 InputField 컴포넌트를 불러와서 입력창을 만들도록한다
1
2
3
4
5
6
7
8
9
10
11
12
13
14
15
16
17
18
19
20
21
22
23
24
25
26
27
28
29
30
31
32
33
34
35
36
37
38
39
40
41
42
43
44
45
46
47
48
49
50
51
52
53
54
55
56
57
58
59
60
61
62
63
64
65
66
67
68
69
70
71
72
73
74
75
76
77
78
79
80
81
82
83
import React, {useState} from 'react';
import {SafeAreaView, StyleSheet, Text, TextInput, View} from 'react-native';
import InputField from '../../components/InputField';

function LoginScreen() {
  // const [email, setEmail] = useState('');
  // const [password, setPassword] = useState('');

  // const handleChangeEmail = (text: string) => {
  //   setEmail(text);
  // };

  // const handleChangePassword = (text: string) => {
  //   setPassword(text);
  // };


  // 사용자로부터 입력받은 이메일,비밀번호 데이터를 담기 위한 state지정(바로 위에 주석 코드에서는 이메일 패스워드를 따로 따로 받았지만 코드를 리팩토링하여 하나의 객체로 받음)
  const [values, setValues] = useState({
    email: '',
    password: '',
  });

  // 사용자가 터치를 했는지 안했는지에 따라 이벤트를 다르게하기위해 state를지정함
  const [touched, setTouched] = useState({
    email: false,
    password: false,
  });

  // 사용자가 입력할때마다 데이터를 state로 넘겨주기 위함
  const handleChangeText = (name: string, text: string) => {
    setValues({
      ...values,
      [name]: text,
    });
  };

  // 이메일 혹은 비밀번호 데이터가 정규식에 적합한지 확인하기위해 엔터 혹은 해당 focus를 떠났을때를 감지하는 blur이벤트 핸들러를 만들어서 touched에 값을 넣어주었다
  const handleBlur = (name: string) => {
    setTouched({
      ...touched,
      [name]: true,
    });
  };

  return (
    <SafeAreaView style={styles.container}>
      <View style={styles.inputContainer}>
        <InputField
          placeholder="이메일"
          error={'이메일을 입력하세요'}
          touched={touched.email}
          inputMode="email"
          value={values.email}
          onChangeText={text => handleChangeText('email', text)}
          onBlur={() => handleBlur('email')}
        />
        <InputField
          placeholder="비밀번호"
          error={'비밀번호를 입력하세요'}
          touched={touched.password}
          secureTextEntry
          value={values.password}
          onChangeText={text => handleChangeText('password', text)}
          onBlur={() => handleBlur('password')}
        />
      </View>
    </SafeAreaView>
  );
}

const styles = StyleSheet.create({
  container: {
    flex: 1,
    margin: 30,
  },
  inputContainer: {
    gap: 20,
  },
});

export default LoginScreen;
This post is licensed under
CC BY 4.0
by the author.
