맛집 앱 만들기 프로젝트 Part7 Pressable 컴포넌트 개념과 Button 컴포넌트 구현하기
공통 컴포넌트
여러 페이지에서 버튼과 같이 동일한 스타일을 여러번 사용하고 싶은경우 컴포넌트를 생성해 가져다 사용하면 효율적으로 구현할 수 있다
Pressable 컴포넌트
Pressable 컴포넌트는 터치 이벤트를 처리하는 데 사용되는 컴포넌트이다
👉🏻리액트네이티브 Pressable 공식문서 여기를 참고
기본적으로 touchableopacity와 같이 버튼의 역할을 하지만, 더 다양한 press 단계를 추적할 수 있다.
-
onPress : 터치가 해제된 후에 호출
-
onPressIn : 터치 되었을 때 호출
-
onPressOut : 터치가 해지 되었을 때 호출
-
onLongPress : 일정 시간(delayLongPress={2000}) 동안 터치가 지속되었을 때 호출
CustomButton 파일 코드 작성
[matzip/front/src/components/CustomButton.tsx]
- 14번째 줄에 PressableProps를 상속받은 이유는 custombutton로 각 컴포넌트에서 onpress 이벤트를 보내는데 onpress이벤트를 처리하기 위해서는 PressableProps를 상속받아서 사용해야한다 label속성은 버튼을 불러올때 버튼이름, variant 속성은 테두리색 여부, size속성은 버튼의 크기, inValid속성은 버튼 활성화 상태를 저장하기 위해 정의해두었다 각 속성에 따라 스타일을 바꾸도록 하단 코드에 스타일시트로 작성하였다
- 21번째 줄에
Dimensions.get('screen').height은 현재 기기의 화면 사이즈를 출력하는데 해당 사이즈를 추출해서 버튼 크기등을 조정하기 위해 deviceHeight에 받았다 - 23번째 줄부터 실제로 각 컴포넌트에서 호출하는 CustomButton부분의 파라미터를 지정한다
...props로 받는 이유는 각 컴포넌트에서 CustomButton을 호출할때 onPress로 터치 이벤트를 전달하는데 해당 이벤트를 담아서 바로 처리할 수 있도록 PressableProps를 상속받은 이유기 때문에...props를 사용하여 받아주었다 - 29번째 줄에 위에서 추가한 interface를 타입으로 지정하여 타입 검사를 진행한다
- 32번째 줄부터 Pressable을 사용하면 리턴 값으로
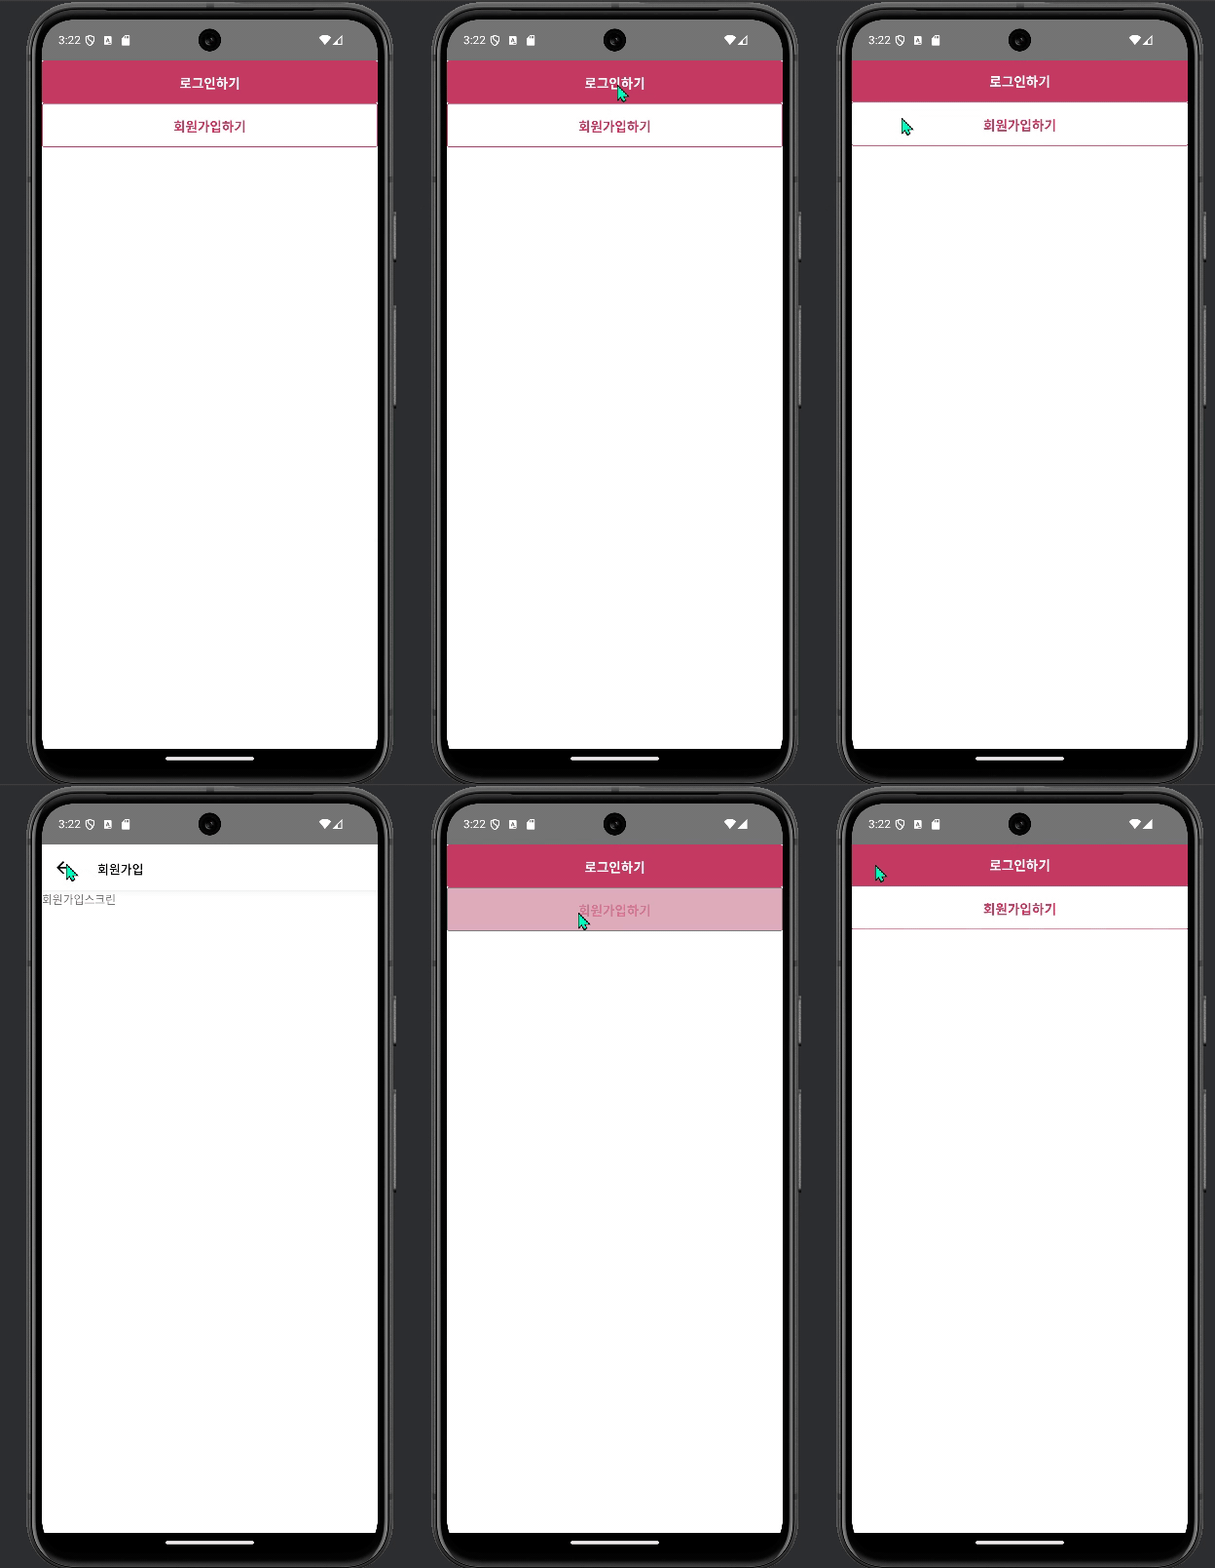
<Pressable></Pressable>을 리턴하는데 disabled 활성화 속성값, style속성 값, pops 를 리턴하여 처리하였다 - 35번째 줄에 Pressable을 사용하면 pressed라는 이벤트를 받을 수 있는데 버튼을 누르면 pressed는 true값으로 전달된다 해당 기능을 이용하면 38번째 줄 처럼 true냐 false냐의 값에 따라 style을 다르게 지정할 수 있다
- 39번째 줄은 inValid 속성은 버튼 활성화 상태로 true인 경우에만
styles.inValid를 적용하도록하였다
1
2
3
4
5
6
7
8
9
10
11
12
13
14
15
16
17
18
19
20
21
22
23
24
25
26
27
28
29
30
31
32
33
34
35
36
37
38
39
40
41
42
43
44
45
46
47
48
49
50
51
52
53
54
55
56
57
58
59
60
61
62
63
64
65
66
67
68
69
70
71
72
73
74
75
76
77
78
79
80
81
82
83
84
85
86
import React from 'react';
import {
  Dimensions,
  Pressable,
  PressableProps,
  StyleSheet,
  Text,
  View,
} from 'react-native';
import {colors} from '../constants';

//  pressableprops를 상속받은 이유는 custombutton로 각 컴포넌트에서 onpress 이벤트를 보내는데
// onpress이벤트를 처리하기 위해서는 PressableProps를 상속받아서 사용해야한다
interface CustomButtonProps extends PressableProps {
  label: string; // 버튼의 이름을 나타내기 위한 속성
  variant?: 'filled' | 'outlined'; // variant 속성은 색상이있는 버튼인지 테두리 색만 있는 버튼인지 구분
  size?: 'large' | 'medium'; // 버튼의 사이즈
  inValid?: boolean; // 버튼의 비활성화 상태
}
// 스마트폰 기기의 화면 정보를 가져옴 (스타일을 기기마다 다르게하기 위해서)
 const deviceHeight = Dimensions.get('screen').height;

function CustomButton({
  label,
  variant = 'filled',
  size = 'large',
  inValid = false,
  ...props
}: CustomButtonProps) {
  return (
    // 여러 스타일을 적용할 때는 배열[]안에 콤마로 구분해서 넣으면 된다
    <Pressable
      disabled={inValid}
      // inValid가 true일때만 styles.invlid 적용
      style={({pressed}) => [
        styles.container,
        styles[size],
        pressed ? styles[`${variant}Pressed`] : styles[variant],
        inValid && styles.inValid,
      ]}
      {...props}>
      <Text style={[styles.text, styles[`${variant}Text`]]}>{label}</Text>
    </Pressable>
  );
}

const styles = StyleSheet.create({
  container: {
    borderRadius: 3,
    justifyContent: 'center',
  },
  inValid: {
    opacity: 0.5,
  },
  filled: {
    backgroundColor: colors.PINK_700,
  },
  outlined: {
    borderColor: colors.PINK_700,
    borderWidth: 1,
  },
  filledPressed: {
    backgroundColor: colors.PINK_700,
  },
  outlinedPressed: {
    backgroundColor: colors.PINK_500,
    borderWidth: 1,
    opacity: 0.5,
  },
  large: {
    width: '100%',
    paddingVertical: deviceHeight > 700 ? 15 : 10,
    alignItems: 'center',
    justifyContent: 'center',
  },
  medium: {
    width: '50%',
    paddingVertical: deviceHeight > 700 ? 12 : 8,
    alignItems: 'center',
    justifyContent: 'center',
  },
  text: {fontSize: 16, fontWeight: '700'},
  filledText: {color: colors.WHITE},
  outlinedText: {color: colors.PINK_700},
});
export default CustomButton;
Colors 상수화 파일 코드 작성
[matzip/front/src/constants/colors.ts]
색깔을 담고있는 상수파일을 저번에 만들어두었는데 해당 컴포넌트에서 반복되는 색상들을 추가하여 상수파일에서 가져와 사용하도록 하였다
1
2
3
4
5
6
7
8
9
10
11
12
13
14
15
const colors = {
  PINK_700: '#C63B64',
  PINK_500: '#BF5C79',
  GRAY_200: '#E7E7E7',
  GRAY_500: '#8E8E8E',
  GRAY_700: '#575757',
  WHITE: '#fff',
  BLACK: '#000',
  RED_300: '#FFB4B4',
  RED_500: '#FF5F5F',
};

export {colors};
AuthHomeScreen 파일 코드 작성
[matzip/front/src/screens/AuthHomeScreen.tsx]
해당 스크린은 로그인을 안한 사용자가 로그인 버튼 및 회원가입 버튼을 보게되는 스크린으로 위에서 만들어둔 custombutton 컴포넌트를 사용하여 버튼을 만들도록한다
-
13번째 줄에 CustomButton을 불러와 버튼을 생성하고 파라미터로 label과 variant 그리고 onPress를 전달한다 로그인에서는 variant 속성을 넘기지 않는데 CustomButton 기본 값이 filled로 되어있기 때문에 회원가입에서만 variant를 전달하여 테두리 있는 버튼을 생성하였다
onPress로 전달하는 값은 navigator에 지정해둔 스크린값으로 각각 상수화했던 변수를 넘겨주어 처리하도록 하였다.
1
2
3
4
5
6
7
8
9
10
11
12
13
14
15
16
17
18
19
20
21
22
23
24
25
26
27
28
29
30
import {StackScreenProps} from '@react-navigation/stack';
import React from 'react';
import {Button, SafeAreaView, StyleSheet, View} from 'react-native';
import {AuthStackParamList} from '../../navigations/stack/AuthStackNavigator';
import {authNavigations} from '../../constants/navigations';
import CustomButton from '../../components/CustomButton';

type AuthHomeScreenProps = StackScreenProps<AuthStackParamList>;
function AuthHomeScreen({navigation}: AuthHomeScreenProps) {
  return (
    <SafeAreaView>
      <View>
        <CustomButton
          label="로그인하기"
          onPress={() => navigation.navigate(authNavigations.LOGIN)}
        />
        <CustomButton
          label="회원가입하기"
          variant="outlined"
          onPress={() => navigation.navigate(authNavigations.SIGNUP)}
        />
      </View>
    </SafeAreaView>
  );
}

const styles = StyleSheet.create({});

export default AuthHomeScreen;
